


As a seller using Magento, you’re always looking for ways to grow your online business. It doesn’t matter if you’re a new seller just starting off or if you’re an established seller already swamped with orders. Either way, you need to find a way to sell more products and then ship them to your customers. Enter Magento drop shipping.
Admin user : dropship Password: dropship123
Drop shipping is a fulfillment process in which you sell items from your Magento storefront that are then shipped to your customer by a 3rd party, usually a wholesaler or manufacturer who stores the inventory. Drop shipping can be a great way to expand your product line, streamline your order and inventory management processes, or kick-start your new online business.
By installing the Magespace Dropship for Magento 2, you will get a reliable bridge that connects your suppliers and customers. At the same time, the extension will eliminate your need to keep goods in stock, but you can always combine drop shipping with other methods. For instance, some products can be available in your warehouse, while others are stored by a supplier. Thus, you make your e-commerce business more flexible. But how does the tool work? Below, you can see our Magento 2 extension tutorial that describes both frontend and backend functionality of the Magespace Dropship Magento 2 Extension.
Configuration
To create a dropship request, go to Fulfillment -> Order Fulfillment -> Prepare Fulfill. Hit the “Fulfill” button that is available on the grid.

On a newly appeared screen, choose the “Request Dropship” shipping channel and hit the “Add Products to Request” button.
Now, tick products. Note that you can select as many items as you want to be drop shipped. It is also possible to set custom quantity and change suppliers. Hit the “Add Selected Product(s) to Request” button.

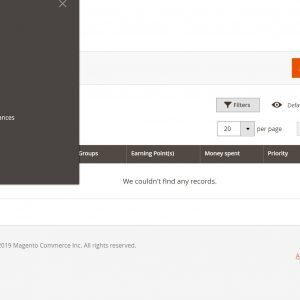
Now, go to Fulfillment -> Dropship -> Dropship Request. You will see the following grid:
Hit the “Edit” button and you will be transferred to the following screen:

Each “Dropship Request Edit” Page is divided into 5 sections: Customer Information; Shipping Address; Supplier Information; Status; and Create Dropship Shipment. While the first 4 blocks provide various data and a link to a supplier page, the last section allows you to edit the dropship quantity, create a shipment, and cancel the request (Back to Prepare Fulfil). Adjust Qty Dropship and hit the “Create Shipment” button.
The shipments tab will no longer be empty. Here, you can view shipment details (from the “Action” column). As for mass actions, you can PDF shipments here.

Dropship Configuration

A shipment view screen is divided into several sections. First of all, it is Order & Account Information where you can view a corresponding order and a customer page

Supplier Management / Configuration /
How to register Supplier and Assign products to supplier account.
Frontend
On the frontend the Magespace Dropship Magento 2 extension has the following appearance:

Order Fulfilment Configuration
The extension configuration is divided into 4 tabs: Order Configuration, Inventory Configuration, Barcode Configuration, and Fulfillment Configuration.
In Order Configuration, you can enable/disable the Verify Order step, keeping order batch number after verified and default Magento ship as well as add tags.
Inventory Configuration contains only one option: Adjust Stock by entering the change qty.

The renewed order fulfillment procedure is divided into 5 steps. First of all, you should verify orders. Next, there is time for fulfillment preparation. It is necessary to pick items related to each order. As for two other steps, they are items packing and delivery. Note that the “Verify Orders” step can be disabled.
Besides, multiple orders can be assigned to batch. To make the process more clear, the Magespace Order Fulfillment extension provides the ability to add tags and notes related to each order. The edge of each order in each step can be recorded as well. As a result, you can filter orders by such parameters as ID, date, total value, status, recipient, batch, and tags. Printing documents, scanning items, and taking package photos are possible within the module. Email notifications for customers can be fine-tuned and send automatically!
As for order listing, the Magespace Order Fulfillment Magento 2 extension lets you create new orders right in the Order Fulfillment section, deactivate default Magento shipping, as well as customize order tags.
It is also necessary to mention that the module offers a detailed dashboard with 5 chart types and 4 kinds of reports. You can select a time range, print reports, as well as download them in multiple formats. For further details, check the following extension tutorial.
Fulfillment
First of all, we’d like to draw your attention to 5 steps of order fulfillment. This is how the Verify Orders screen looks like:
You can see orders in all batches, filter them, export data, view notes, verify each order separately or in bulk. Other mass actions are: hold, cancel, set tag, move to batch, and print. Each order age is shown in a grid. Other information is available in the following columns: ID, Created At, Recipient, Total, Status, Batch#, Purchase Point, Note, and Tag.
As for the Prepare Fulfil screen, It provides almost the same opportunities with some additional data. For instance, there is the Qty column in the Prepare Fulfil grid. Besides, the grid allows you to view each order and fulfill it. As for mass actions, they are: Back to Verified, Dropship, Hold, Set Tag, Move to Batch, and Print.
Next, you should create a fulfillment request: click the fulfill button that is available in the aforementioned grid and add products.

Now, you should pick items. The appropriate screen contains two grids. The first one illustrates orders that should be completed with items, while the second grid displays recently picked orders. For the first grid, you can print a picking list as well as add/remove to/from the batch in bulk. As for mass actions for recently picked orders, you can only print picked items. You can scan picked order items here as well as view details.
While viewing order details, the Magespace Order Fulfillment extension provides the ability to scan items, set picked quantity, change status, mark items as picked, and move items to prepare to fulfil. While leaving a comment, you can notify the customer by email as well as make comment visible on the storefront.
The Packing Requests page also contains 2 grids: with unpacked and packed items respectively.
Magespace Order Fulfillment Magento 2 Extension Review; Magespace Order Fulfillment Magento 2 Module Overview
And this is how you create packages on the backend:
The Delivery Packages screen provides the ability to scan tracking numbers, view order details, as well as print packing slips and shipping labels.
Order Listing
The Order Listing Screen is divided into 6 tabs: All Orders, Awaiting Payment, Back Orders, Hold Orders, Completed Orders, and Canceled Orders. Along with filtering, such structure helps to find certain orders as fast as possible. The available mass actions include Hold, Unhold, Cancel, Set Tag, Move to Batch, and Print. Besides, you can export orders via CSV or XML. Creating a new order is also possible.


Thomas –
Our dropshipping suppliers are really happy. It really helped us.